Understanding ABR: A Hands-On Tool to Modern Video Streaming Protocols
Adaptive Bitrate (ABR) video streaming is the invisible engine that powers the way we watch video today, from live sports and news to movies on our favorite OTT platforms. Yet, despite being everywhere, the inner workings of ABR protocols like HLS, DASH, and CMAF are often misunderstood or hidden behind the scenes. To help bridge that knowledge gap, we’ve created an interactive protocol inspector tool that allows you to see exactly what’s happening under the hood as your device streams video.
This article provides a guided introduction to the core concepts of ABR technology and complements the tool with step-by-step explanations. Whether you’re new to streaming or looking to deepen your technical know-how, this combined walkthrough will help you understand how players choose quality, how manifests are structured, and how video segments are delivered to your screen in real time.
Online Video Streaming Protocol Inspector Tool
(A Comprehensive Video Streaming Tutorial)
This online video streaming protocol inspector tool helps you understand how Adaptive Bitrate (ABR) video streaming protocols work.
For those who are not familiar ABR streaming protocols concepts, you will find a simple comprehensive tutorial of ABR Video Streaming technology at the bottom of this article.
Reading the whole article while using this tool, will give you a clear detail of how ABR video streaming works.
This tool has been designed to simplify the understanding of ABR video streaming protocols through visual examples, allowing you to inspect video packets and understand the differences between protocols and how they work.
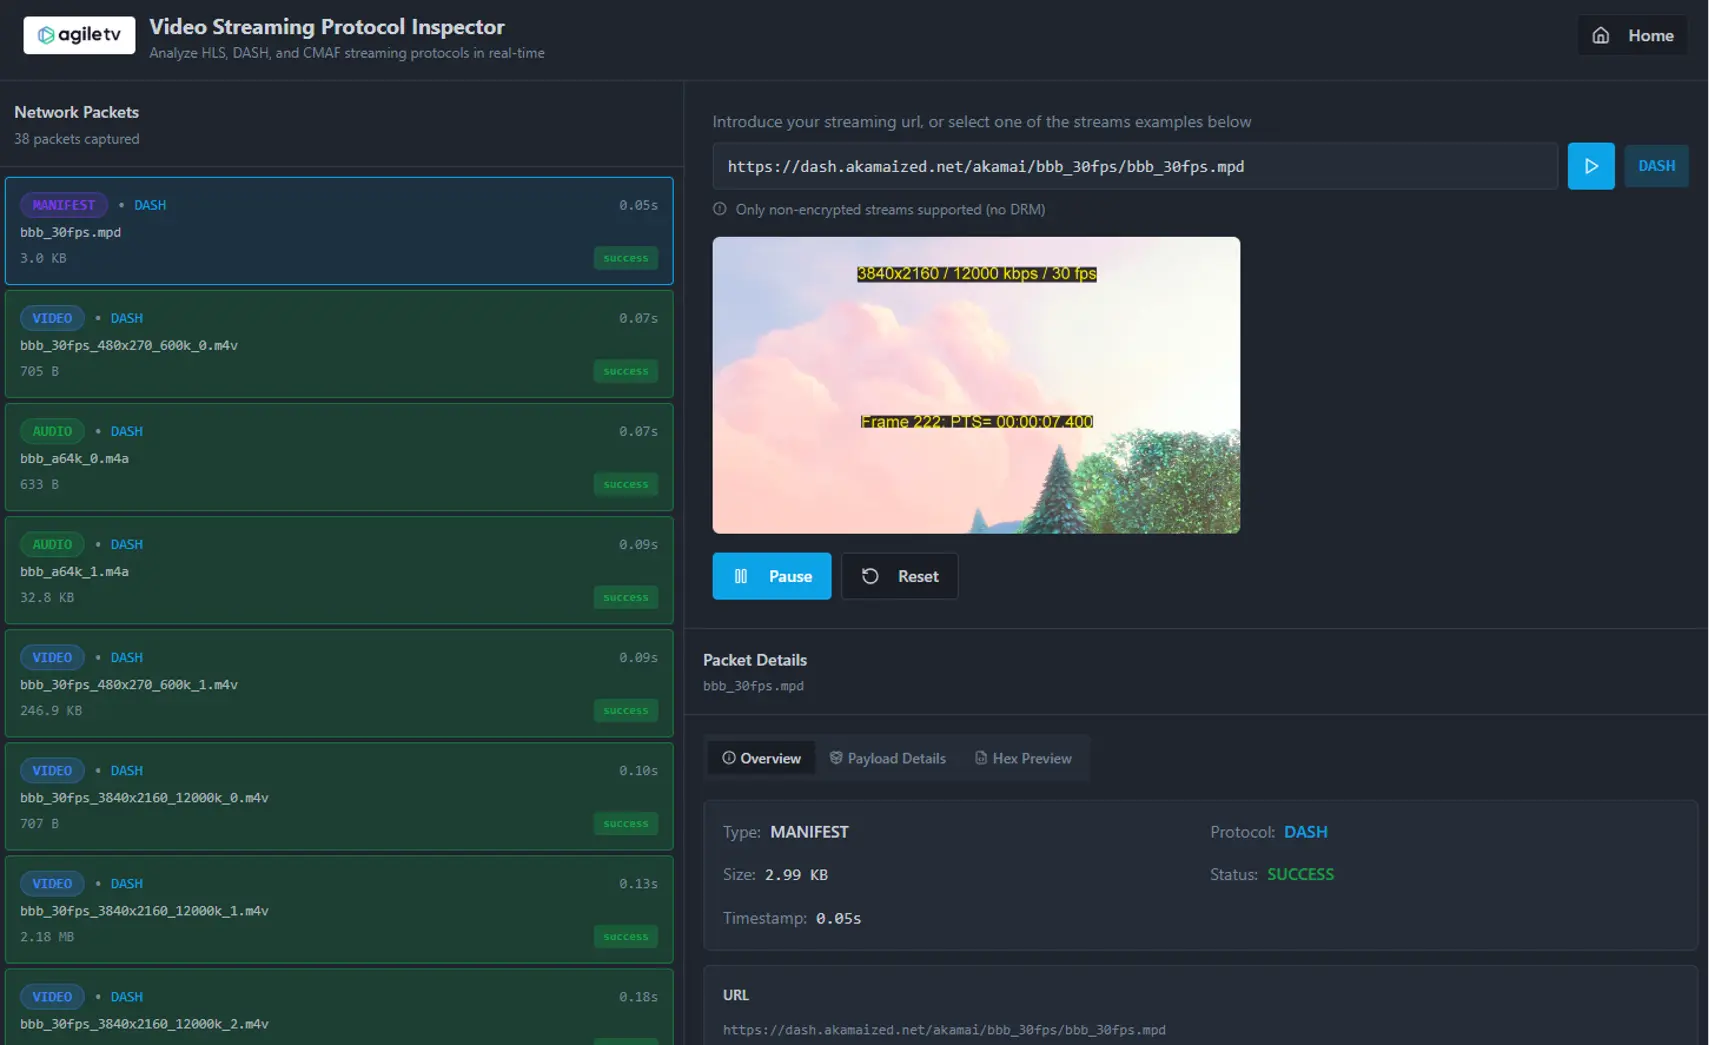
On the home page, you can enter a streaming URL (non-encrypted) or select one of the three example streams.
When you click play, the player starts to download manifest files and video and audio chunk files (packets) to reproduce the content. You need to click again on Play button to reproduce the content in the player.
In the HLS Example, you can see how the player downloads a first Video chunk to calculate the available bandwidth of your Internet connection and selects the profile of the content to download.
The master playlist (Manifest) contains the different profiles and the Media Playlist. You can inspect every packet by clicking on every of them. If you click on the ones classified as Manifest, you will be able to see the overview, the details and even the Hexadecimal preview.
The main playlist (manifest) shows all the video and audio track playlists for the different profiles.
If you click on one of the media playlists, you will see the same manifest details along with a tree view below the main “Manifest Detail” window.
You can inspect all the segments, their duration, and the URL of each one.
If you click on a Media (Video+Audio) segment chunk, you will see the details of the Payload and what kind of Media Container is formatted. In this case, it is a MPEG-2 TS (Transport Stream).
In TS different data (Video, Audio, Subtitles and Data) are multiplexed into a single stream.
In MPEG-2 Transport Stream (TS) segments (commonly used in HLS implementations), multiplexing is the process of interleaving different types of data into a single stream so they can be transmitted or stored together.
Here is how video, audio, and subtitles are combined:
- The “Slicing” (Packetization)
Unlike MP4 files which often store tracks separately (e.g., all audio at the end or beginning), TS is designed for transmission.- Elementary Streams (ES): The raw video (e.g., H.264) and audio (e.g., AAC) data.
- Packetized Elementary Streams (PES): The raw data is wrapped with headers containing timestamps.
- Transport Packets: The PES are chopped into tiny, fixed-size packets of 188 bytes each.
- The “Mixing” (Interleaving)
The multiplexer takes these 188-byte packets and mixes them sequentially.For example, a stream might look like this sequence of packets: [Video Pkt] – [Video Pkt] – [Audio Pkt] – [Video Pkt] – [Subtitle Pkt] – [Audio Pkt]…
This interleaving ensures that the player receives audio, video, and subtitle data concurrently as it downloads the file, rather than waiting for the whole video track to finish before receiving audio.
- Identification (PIDs)
Since all packets look identical (188 bytes), how does the player know which is which? Every packet header has a PID (Packet Identifier), a 13-bit number.- PID 256: Might contain Video data.
- PID 257: Might contain Audio data.
- PID 258: Might contain Subtitles.
- The “Map” (PAT and PMT)
To decode the stream, the player looks for special “Metadata” packets that appear periodically:- PAT (Program Association Table): Tells the player what “Programs” (channels) are inside the stream.
- PMT (Program Map Table): The specific map. It tells the player: “For this video, the Video Track is on PID 256 and the English Audio is on PID 257.”
- Synchronization (PCR, PTS, DTS)
To ensure the subtitles appear exactly when the actor speaks, TS uses a strict timing mechanism embedded in the packet headers:- PCR (Program Clock Reference): A master ticking clock sent frequently to synchronize the player’s internal clock with the stream.
- PTS (Presentation Time Stamp): Tells the player exactly when to display a specific video frame or play an audio chunk relative to the PCR.
By clicking Reset or Home buttom, you will come back to the home page, where you can select a DASH example and click Play to reproduce and inspect the MPEG DASH example. You will see the different segments and the differences between DASH and HLS.
If you inspect a DASH .mpd manifest you will see the structure and format on the Payload Details.
In this case, the packet capture will show different Video and Audio segments with a different Media Container format. In this case, MP4.
Think of an MP4 file (MPEG-4 Part 14) not as a video format, but as a digital shipping container.
On the outside, it looks like a single box (video.mp4), but inside, it is a highly organized cabinet with distinct drawers. Its job is to hold different types of media synchronization, so they play back together perfectly.
Here is the simple breakdown of the MP4 structure:
- The Hierarchy (Atoms/Boxes)
Unlike the “Stream of packets” in the Transport Stream (TS) you asked about earlier, an MP4 is organized into a hierarchy of objects called “Atoms” or “Boxes.”
You can visualize an MP4 file as having three main parts:
- The Label (ftyp): This is the very first part of the file. It simply tells the player, “I am an MP4 file,” and specifies which version of the standard it uses.
- The Brain (moov): This is the Metadata. It does not contain any actual video or audio. Instead, it contains the “Table of Contents.” It tells the player:
- How many tracks there are (Video, Audio, Subtitles).
- Which Codec is used (e.g., H.264).
- Crucially: The exact byte location of every single frame. (e.g., “Frame 100 starts at byte 50,004 inside the mdat box”).
- The Body (mdat): This stands for Media Data. This is the heavy part of the file. It is a massive blob of raw binary data containing the actual video frames and audio samples mixed together.
- How the Player Reads It
When you open an MP4 file: - The player reads the ftyp to ensure it can open the file.
- The player must read the moov atom (The Brain) first. It loads this index into memory.
- When you press play, the player looks at the index, finds where the video data starts in the mdat (The Body), and jumps to that byte to start decoding.
-
- The “Fast Start” Issue (Web Optimization)
In a standard MP4 created by a camera, the moov (index) is often written at the very end of the file, because the camera doesn’t know how big the file is until you hit “Stop Recording.” - The Problem: If you put this file on a website, the browser has to download the entire video (GBs of data) just to get to the end, read the index, and start playing.
- The Solution (Fast Start): A software tool moves the moov atom to the front of the file. Now, the browser downloads the first few kilobytes, reads the index, and can start streaming the video immediately while the rest downloads in the background.
- Fragmented MP4 (fMP4) for ABR
For the ABR streaming (HLS/DASH), we use a variation called Fragmented MP4.
Instead of one giant moov (index) and one giant mdat (data), the file is chopped into tiny pieces. Each 4-second chunk of video has its own tiny index (moof) and its own tiny data blob (mdat). This allows the player to download just segment #5 without needing to know the structure of the whole movie.
You could see an example on the Payload details of a MP4 chunk.
If you inspect a CMAF stream example, you will see the differences on the manifest and how in this case, the Media Playlist offers segments by byteranges.
In the Tree preview, you will inspect the segments and their byteranges. In this case, the player can download the segments dynamically adjusting the length of the segments.
In the context of CMAF (Common Media Application Format), there are two ways to store the video:
- Segmented Mode: Thousands of tiny separate files (e.g., seg1.m4s, seg2.m4s).
- Single File Mode: One massive file (e.g., movie.cmfv) that contains the entire movie.
When using Single File Mode, the player uses HTTP Byte Ranges to download just the specific segment it needs without downloading the whole movie.
Here is the explanation of how this works.
- The Concept: The “Book” Analogy
Imagine the CMAF file is a 1,000-page book.
- Segmented Mode: You rip every chapter out and bind them as separate little booklets. To read Chapter 1, you pick up the “Chapter 1” booklet.
- Single File (Byte Range) Mode: You keep the book intact. To read Chapter 1, you look at the Table of Contents (The Manifest), which tells you: “Chapter 1 starts on page 50 and ends on page 60.” You then open the book exactly to those pages.
Step 1: The Manifest Lookup
The player downloads the Manifest (HLS or DASH). In Single File mode, the manifest doesn’t just list filenames; it lists the Byte Offset (start position) and Byte Length (size) for every segment.
#EXT-X-MAP:URI=”movie.cmfv”,BYTERANGE=”800@0″
#EXTINF:4.000,
#EXT-X-BYTERANGE: 120000@800
movie.cmfv
- 120000@800 means: “Start at byte 800 and read the next 120,000 bytes.”
XML
<SegmentBase indexRange=”0-800″>
<Initialization range=”0-799″ />
</SegmentBase>
Step 2: The Player Request
The player calculates the range and sends a GET request to the CDN. It adds a special header: Range.
Request: GET /video/movie.cmfv HTTP/1.1 Host: cdn.example.com Range: bytes=800-120800
Step 3: The Server Response (206 Partial Content)
The CDN recognizes the Range header. Instead of sending the whole file (which would be a standard 200 OK response), it sends only that specific slice of data.
Response: HTTP/1.1 206 Partial Content Content-Range: bytes 800-120800/50000000 Content-Length: 120000
[…Binary Data for that specific segment…]
- Why use Byte Ranges with CMAF?
- File Management: It is much easier for content providers to manage 1 file per quality level (Low.cmfv, Medium.cmfv, High.cmfv) than to manage 100,000 tiny files for a single movie.
- CDN Performance: CDNs are very efficient at caching these “ranges.” If User A watches the first 10 minutes, the CDN caches those byte ranges. If User B jumps to the end, the CDN fetches and caches those specific byte ranges from the end.
-